4 Temmuz 2012 Çarşamba

Cream Cheese Stuffed Strawberries

To contact us Click HERE

Follow Me on Pinterest

Looking for something fun to make for your Fourth Of July celebration? These cute Cream Cheese Stuffed Strawberries might be just the thing. Especially with a nice blueberry on top. Kind of fits with a red, white and blue theme, wouldn't you say? If you are looking for some great main course dishes, sides or desserts for your holiday celebration check out my post of 50 Summer BBQ Recipes.  


Ok then, let's fancy up some berries...you and me, baby. 

Cream Cheese Stuffed Strawberries
Time: 20 minutes
Yield: About 30 strawberries
Recipe adapted from The Sisters Cafe
PRINT RECIPE
PRINT RECIPE WITH PICTURE


2 (1 pound) containers strawberries
2 (8 ounce) packages cream cheese, softened
6 T powdered sugar
2 T orange juice (fresh, or from a bottle)
1 C cool whip
1 t vanilla
dash salt


1. Wash your beautiful berries and pat them dry. 


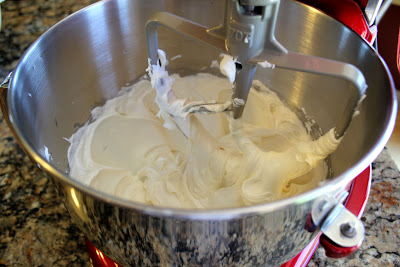
2. In your stand mixer, or large mixing bowl, beat 2 packages of softened cream cheese until smooth. Add 6 tablespoons of powdered sugar, 2 tablespoons orange juice, 1 cup cool whip, 1 teaspoon vanilla and a dash of salt. Beat until well combined and smooth. 


3. Set the strawberries up on their green stems. With a sharp knife cut a slit through the top of each strawberry, making sure you don't cut all the way through to the stem. 


4. Cut another slit along the top, forming an x pattern. 


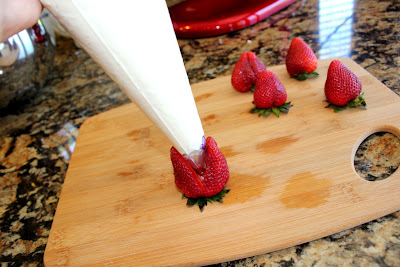
5. Place a large open star tip in a pastry bag and fill the bag with the cream cheese mixture. If you don't have a large star tip, or a pastry bag, you could just use a large ziploc bag and cut a small hole in the end. 


6. Pipe the cream cheese filling into the cut end of each strawberry. 


7. Place a blueberry on the top and set them on a pretty platter. Refrigerate until serving. 


July Menu Plan 2012

To contact us Click HERE
Red White and Blue Cookies, Creamy Chipotle Black Bean Chicken,Sloppy Joes, Crispy Cheddar Chicken, Grilled Turkey and Swiss, Teriyaki Chicken Noodle Bowl, Raspberry Cream Cheese Pretzel Salad, Asian Grilled Chicken
Follow Me on Pinterest

Good gravy, it's July! One month of summer fun already under the bridge and sealed up in your life history book, never to be lived again.
Amazing how that happens, isn't it. 
I started this summer full of wonderful intentions. My kids were going to read 20 minutes every day, practice a musical instrument 20 minutes a day and have fun for at least 20,000 minutes every day. This seems like a very fair, reasonable and fabulous plan, would you not agree? 
Kids need a little bit of structured time, even in the summer...is what I told them. 
One morning early in June all of my kids (excepting the 14 year old who gets a real kick out of sleeping in) were busily engaged practicing their varius musical instruments. I was feeling oh-so-productive and proud of us for sticking with our plan and meeting our goals. (It was the second day of summer.) 


My house was one rockin' place. I can tell you that. One very loud indian drum song was being pounded out on the living room piano, one small boy was screeeeeeeching out some painfully beautiful notes (if you could only hear just how painfully beautiful they were....) on his little violin, my oldest daughter was in the basement practicing The Entertainer at full volume, twice as fast as she should and my other small boy had his electric keyboard up full blast and was jamming it out, man.

Um. 


It was...really, really breathtaking...best described by my 14 year old son who stumbled up the stairs in a sleepy stupor, found me doing the breakfast dishes and whispered in my ear...


"I think this is what hell sounds like."


I could have reprimanded him for saying hell, but what can an old girl do when the truth is spoken so plainly. So I simply said,


"It sure does, now go and find your guitar and get busy with your 20 minutes of practice."


Then I put the cotton balls back in my ears...


and finished up the dishes. 

Chicken Stuffed Crescent Rolls
I have my monthly menu plan for you today. As usual, colored titles are previously posted recipes. Black titles are recipes I'm working on and hoping to post in the future. Hope you find something to love. Have a great and safe Fourth Of July, everyone. Hope to see you back here soon, more new recipes lay in wait just for you and your screechy violin. :)

MONTHLY MENU PLANPRINT THE PLAN
PREVIOUSLY POSTED RECIPESDINNERCreamy Chipotle Black Bean Chicken, Tortillas, Lettuce, TomatoesSloppy Joes, Green Salad and WatermelonCrispy Cheddar Chicken,  Rice Pilaf and PeasGrilled Turkey and Swiss, Chips and Fresh FruitTeriyaki Chicken and Noodle BowlAsian Grilled Chicken and Sesame NoodlesChicken Stuffed Crescent Rolls, Rice and Roasted AsparagusAsian Lettuce Wraps and Ham Fried RiceBBQ Ranch Chicken Salad and Watermelon
DESSERTS AND OTHERRed White and Blue CookiesRaspberry Cream Cheese Pretzel SaladCreamy Ranch, Bacon and Tomato Pasta SaladEasy Caramel Smore BarsEasy Cream Cheese DanishAlmond Butter Sheet CakePepperoni Pasta SaladFluffy Strawberry Salad
Easy Cream Cheese Danish
RECIPES I'M WORKING ONDINNER:Smokey Honey BBQ Grilled Pork Ribs and Baked PotatoesGrilled Parmesan Shrimp with Grilled Vegetable Medley and RiceGrilled Chicken Salad with Berries and Raspberry VinaigretteCreamy Pesto Pasta, Grilled Garlic Bread and OG SaladSimple Southwest Chicken QuesadillasCilantro Lime Chicken (Crock Pot)Buffalo Chicken EnchiladasGinger and Cilantro Baked Tilapia
DESSERT AND OTHER:Rocky Road BrowniesPink Lemonade CupcakesBreakfast Cinnamon Sticks with Cream Cheese GlazeGrilled Pineapple with Ice Cream and Caramel SauceOld Fashioned Oatmeal Cake with Broiled Coconut FrostingFrozen Raspberry LemonadeFresh Fruit Salad with Honey Lime Dressing Sweet and Crunchy Broccoli SaladHomemade Yeast Scones and Cinnamon Maple Honey Butter
 Almond Butter Sheet Cake


Cinnamon Swirl Bread

To contact us Click HERE
I always like to make a little something special for breakfast on holidays. I think I have mentioned it before but it is that whole tradition associated with holiday thing with me.


The boys and I had a great time making this bread. The nice thing about making bread with the kids is that since the bread needs a couple rises, there are breaks that they can play and it doesn't seem like drudgery. My boys both love to measure and pour the ingredients. They love to turn on the mixer and give the dough some kneading. H especially loves to smell the ingedients and what we are making along the way. They both enjoyed rolling out the dough and patting the filling on. Really, I think they like making bread because it is so hands on.


This dough is really great to work with. It comes together really nicely. It also seemed easy to roll out. The hardest part for me was making sure it was the right measurements (8x16) before adding the filling and rolling up into a loaf shape.


This recipe had some tips that were different than any that I have seen for a swirl type of bread. They really helped though. The first was to use an egg wash vs. butter to help keep the bread from unravelling when slicing. Butter acts as a barrier between the pieces of rolled-up dough, preventing them from cohering, and giving you bread that "unravels" when you cut it. On the other hand, the protein in egg acts like glue, cementing the bread and filling together, and allowing much less (though still a bit) unraveling. The second is to blend the sugar, cinnamon and raisins until smooth. This well help the filling be more cohesive and moist as well as add a subtle flavor. I used a small food processor. Again, a small appliance that boys love to operate.


The filling makes this bread moist and the flavor is oh.so.good! Yum! This bread is also different, and better, than store-bought because of the topping. 


The house smelled out of this world while it was baking! 


Cinnamon Swirl Bread
King Arthur Flour
Dough
3 cups King Arthur Unbleached All-Purpose Flour
1/4 cup potato flour
1/4 cup Baker's Special Dry Milk
1 1/4 teaspoons salt
1/2 teaspoon cinnamon
3 tablespoons sugar
2 1/2 teaspoons instant yeast
4 tablespoons butter
1 cup water


Filling
egg wash, made from 1 egg  with 1 tablespoon water
1/4 cup sugar
1 1/2 teaspoons cinnamon
1/4 cup raisins or currants
2 teaspoons all-purpose flour


Topping
2 tablespoons butter
2 tablespoons sugar
1/4 teaspoon cinnamon
1/4 cup all-purpose flour


In a large mixing bowl, combine all of the dough ingredients, mixing till the dough begins to come away from the sides of the bowl. Knead the dough with an electric mixer for 2 minutes; allow it to rest for 15 minutes, then continue kneading it for an additional 5 to 7 minutes, or until it's smooth. If you're kneading by hand, transfer the dough to a lightly oiled work surface; knead it for 3 minutes; allow it to rest for 15 minutes, then continue kneading till smooth, an additional 8 to 10 minutes. Transfer the dough to a lightly oiled bowl, cover the bowl with plastic wrap, and set it aside to rise for 1 to 1 1/2 hours; it'll be puffy, if not doubled in bulk.


Transfer the dough to a lightly oiled work surface, and shape it into a long, thin rectangle, about 16 x 8 inches. Brush the dough with some of the beaten egg, combine the filling ingredients, and pat them gently onto the dough. Beginning with a short edge, roll the dough into a log. Pinch the side seam and ends closed (to keep the filling from bubbling out), and place the log in a lightly greased 8 1/2 x 4 1/2-inch loaf pan. Cover the pan with lightly greased plastic wrap or a dough-rising cover, and allow the bread to rise for about 1 hour at room temperature, or until it's crowned about 1 inch over the rim of the pan.


In a small bowl or mini processor, combine the streusel ingredients, cutting in the butter until the mixture is crumbly. If you're using a mini processor, watch carefully; streusel will go from crumbly to a cohesive mass in just a second or so. Brush the loaf with some (or all) of the remaining beaten egg, and gently press on the streusel.


Bake the bread in a preheated 350°F oven for about 45 minutes, tenting the loaf lightly with aluminum foil for the final 15 minutes or so if it appears to be browning too quickly. Remove the loaf from the oven, and after about 5 minutes, gently remove it from the pan. Some of the streusel will fall off, but you cal alleviate this by first loosening all around the edges of the loaf with a knife, then turning the pan on its side and gently pulling it away from the loaf. Streusel will continue to fall off as you maneuver the bread  but you'll still be left with some nice, sweet topping.

Beet Greens with Sweet Onions and Feta Cheese

To contact us Click HERE
We belong to a CSA (Community Supported Agriculture). If you aren't familiar with a CSA, you pay for a share (full or half) to a local farmer before the season starts. Then you get a share of whatever the farm produces. I think it is one of the greatest things we have ever done. For one, I love beets. Two, my boys eat a variety of vegetables that I probably would not buy at the store, because I had never had them, like kohlrabi for example.  Three, I love knowing WHERE and HOW our food was grown and WHEN it was picked, usually the morning of distribution day. 


Anyway, back to my love of beets. When we first got beets in the CSA box, I was a little nervous. Way back, when it was just me and Ray, we tried fresh beets from a store.  I roasted them and they had this taste that neither Ray nor I liked. Woodsy and gross. They were huge and who knows how long they had been there. Our farmers knew we were new to a CSA, so they gave us advice on how to prepare certain veggies and what we could use. When they told us we could eat the greens as well as the beet root, I was a little surprised. I had never heard of that. I was still leery of the beet itself, so I started looking for a recipe to use the greens.  Later, I will share a recipe for the beet itself that is SO good! Thus began our love of beets.


I've made this a number of times. Ray and I prefer it with chard or beet greens. You can also use kale, escarole, mustard greens or collards. C even liked it, although he wouldn't admit it. As always, I put a portion of everything on their plates, with the family rule that you at least try one bite of everything on your plate. C took one bite, then kept going back until it was gone. 


This recipe is quite easy to make. The hardest part is washing and stemming the greens. If you use young, tender greens you won't need to stem the greens. With beet greens, if the beets are big enough to pull from the ground, you need to stem the greens. To stem, hold the stem with one hand and using your pointer and thumb of the other hand, slide up the stem of the green. Once you do it, you'll see what I mean. You can do this part while caramelizing the onions. It is more chopping and sautéing than anything. 


You could serve this over short pasta, but we like it by itself, sometimes with a hunk of crusty bread to mop up the juices.


Beet Greens with Sweet Onions and Feta Cheese
Adapted from The Vegetable Dishes I Can't Live Without


2 tablespoons extra-virgin olive oil
3 cups sliced sweet onion, such a Vidalia, I used one large
3 larges bunches fresh beet greens, stemmed if necessary and coarsely chopped (~12 cups)
salt, to taste
feta cheese, crumbled, up to 1 cup
freshly ground black pepper to taste


Put olive oil in a large, deep skillet over medium heat. After about a minute, add the onions and sauté over high heat for about five minutes. Reduce heat to medium, cover the pan and let the onions cook until very tender, about 10 more minutes.


Add the beet greens in batches, sprinkling lightly with salt after each addition and turning them with tongs, bringing up the wilted ones from the bottom to the top of the pile.


When all the greens have wilted, stir in the cheese and cook for about 2 minutes. Sprinkle generously with black pepper. 


Serve hot or warm.


Sea Salt Caramel Coffee

To contact us Click HERE
It's National Coffee Day!!
To celebrate, here is my version of a Salted Caramel Mocha Coffee.
You will need:
-half & half (or your favorite creamer or milk)*
-chocolate sauce
-caramel sauce
-whipped cream
-sea salt
-brewed coffee


 Place 2-4 Tbsp. of half & half (depending on how creamy you like it) into a cup.  Add 1 tbsp. each of caramel sauce and chocolate sauce.

Heat in microwave for about 15 seconds, till warm.  Use a whisk to blend together and make it a bit frothy.


 Add coffee.  Top with whipped cream.  Drizzle whipped cream with a bit of chocolate sauce and caramel sauce (if desired).
Sprinkle the top of the coffee with a little bit of coarse ground sea salt. I rubbed the sea salt together in my hand over the cup.  Just a pinch goes a long way, but adds a delightful sweet/salty flavor to the coffee!

 
*You can also make this with milk, up to a 1/4 C. just heat and froth the same way as above.  
Enjoy!

I'm Back with a Schnitzel Recipe

To contact us Click HERE
I'm back---FINALLY!  Sorry about the really long silence, just a lot going on and I was having a hard time keeping up.

We are in the middle of birthday month (four birthdays in our house in a month) and one of our traditions is the birthday person gets their favorite dinner.  Our youngest just turned 15 and he asked for schnitzel and mashed potatoes.  This is more of a how to than a recipe as there are no exact measurements.


For the schnitzel you will need:

Thinly sliced eye of round or similar meat (you can also use pork or veal)*
Flour
Eggs whisked with a little water
Italian style bread crumbs (we use homemade from the Shortcut Cooking Cookbook)
Lemon Wedges

Dredge the meat in flour to coat.
Dip meat in eggs and then in the bread crumbs, coating completely.
Fry in a pan with about a 1/2" of oil. Turn after 1-2 minutes. 
To keep warm, place on a rack in a warm oven while you finish cooking all the meat.

Serve with lemon wedges.

*You can have the butcher thinly slice your meat, or to do it yourself: place roast in freezer for about one hour, then slice thinly with a knife or meat slicer.  Freezing the meat for a bit makes it much easier to slice.

Tomorrow I will share the recipe for our dairy free roasted garlic mashed potatoes.

Roasted Garlic Mashed Potatoes (Dairy Free)

To contact us Click HERE
Mashed potatoes are comfort food at it's best! 
My family loves mashed potatoes, but they are traditionally laden with butter, cream or other dairy products.  When we had to take dairy out of our sons diet several years ago, it was a challenge to find a way to make mashed potatoes that didn't result in gluey or tasteless potatoes.  Here is what we came up with:


Roasted Garlic Mashed Potatoes

~Again, this is more of a how to than an actual recipe, we always make a big batch to keep in the refrigerator for later in the week.  These potatoes also freeze well.

-roasted garlic (see below)
-potatoes
-dairy free margarine (there are a few brands available)
-chicken broth
-salt and pepper, to taste


Boil your potatoes until soft, we like to leave the skins on.  While the potatoes are boiling, in a separate saucepan, heat chicken broth and margarine till hot, add roasted garlic, salt and pepper.


Drain potatoes.  Place potatoes back in warm pot and slowly add the butter/broth mixture a little at a time, mashing the potatoes as you go.  Add enough of the broth mixture to get desired consistency.

*The roasted garlic adds a mild garlic flavor without being overwhelming (you can leave the garlic out if you don't like it).

*Heating the broth keeps the potatoes from getting the gluey texture that happens when you add cold ingredients to the hot potatoes.

*Chicken broth adds the necessary liquid without giving the potatoes an off flavor that some of the milk substitutes can add.


Roasted Garlic

Sorry, I forgot to take a picture of this step. I usually make the garlic early in the day and keep it in the fridge till I am ready to use.
-garlic
-olive oil

Cut the tops off from whole cloves of garlic, leaving the root end intact and holding the cloves together.  You want to trim just enough off to expose the garlic cloves. Leave the papery skin on the outside.

Place garlic in a pan and drizzle with olive oil. Cover with foil.

Bake at 350 degrees until the garlic is tender when pierced with a fork, about 30-45 minutes. 

Cool garlic and then squeeze out of the skin.  Store in an airtight container in the refrigerator until ready to use.

Serve mashed roasted garlic as an alternative to butter, spread on toasted french bread.

*Beware, the smell of roasting garlic can make your family drool and constantly ask what's for dinner!  :)