24 Haziran 2012 Pazar

Scalloped Potatoes

To contact us Click HERE

   Ummm.. yes, this another potato recipe. I am fully addicted to starchy, delicious potatoes and I'm the first to admit it. Admitting your addictions is the first step, my friends. The first step.
   Even though I'm admitting my addiction, I wont be trying to recover anytime soon. Especially now that I've made these sinful things. Thinly sliced potatoes, layered with smoked Gouda cheese and fresh chives.... *drool*


Scalloped Potatoes
3-4 large Idaho Potatoes, thinly sliced
1-1/2 cups smoked Gouda cheese, shredded1-1/2 cups Monterey Jack cheese, shreddedfresh Chives, choppedsalt & pepper

Directions:  Preheat oven to 400 degrees. Spray an 8x8 glass baking pan with non-stick spray.
 Layer potato slices, slightly overlapping. Sprinkle a tiny bit of salt & pepper, and then top with both cheeses and a few chives. Repeat layer, 2 more times. You will have 3 layers total.
Cover with foil, and bake for 30 minutes. Remove foil, and bake another 10-15 minutes or until cheese is slightly browned and bubbly. Let stand a few minutes before serving.


Source: Care's Kitchen

Chinet Bakeware Winner!

To contact us Click HERE


   I want to thank everyone who entered the Chinet Disposable Bakeware giveaway! There were over 155 entries! Such a great turnout! To randomly choose the winner, I asked my daughter Kelsey to pick a number between 1 and 156. Drumroll please......


                                                       Comment #55  kim

Kim said, "I think I would bake my Mom a cakefor Mother's Day! I love the idea of giving someonethe pan and not worrying about getting it back."
Congratulations Kim!
I already emailed you for your address info!
Again, thank you to everyone that entered. I have another giveaway coming soon! :)

Barbecue Cups

To contact us Click HERE

   I love fun, new ideas for dinner. These barbecue cups fit the bill. I saw these on my friend Brandy's blog a few weeks ago. I immediately bookmarked the recipe and decided to make them last week.

   They are biscuit dough filled with cooked ground beef that's drenched in barbecue sauce, and topped off with some cheddar cheese. Pop em' in the oven for 10 minutes or so, and dinner is done! So easy, and so good!


Barbecue Cups

1 pound lean ground beef
1 cup barbecue sauce
1 (12 ounce) can refrigerated biscuits
1 cup shredded cheddar cheese


Directions:  Preheat oven to 375 degrees. Spray a muffin tin with non-stick spray. Set aside.

Cook ground beef in a medium skillet until brown. Drain grease. Pour in barbecue sauce. Stir and cook until heated through. About 5 minutes. Remove pan from heat.

Seperate biscuits, and then press them up and along sides of muffin tins. Divide the beef mixture evenly between each biscuit dough cup. (You may have a little meat leftover). Sprinkle each with shredded cheddar cheese.

Bake for 10-12 minutes or until biscuits are golden brown.  Serve!


Recipe Source: Pillsbury
Linked up at: Trick or Treat Tuesday
Totally Tasty Tuesdays

Mozzarella & Pepperoni Stuffed Chicken

To contact us Click HERE

  We eat a lot of chicken at our house. It's healthy, it tastes good and there's a million ways to dress it up! I knew this Mozzarella & Pepperoni version would be awesome. It tastes like pizza without the crust.

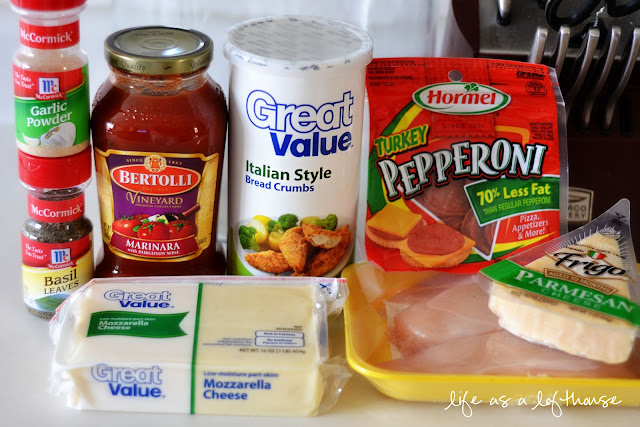
   I changed the original recipe just a little bit. I stuffed ours with turkey-pepperoni, and a slice of mozzarella. Then I coated the chicken in dried Italian bread crumbs. You could make this even more wonderful by adding some fresh cut up veggies too. I think I'll do that next time.

My house smelled heavenly as it baked. This chicken was pure deliciousness!


Mozzarella & Pepperoni Stuffed Chicken

4 boneless, skinless chicken breasts
4 (1 ounce) slices Mozzarella cheese, plus 1 cup shredded Mozzarella
16 slices pepperoni
dried basil
garlic powder
1/2 cup dried Italian bread crumbs
1 jar Marinara sauce
1/2 cup shredded Parmesan cheese


Directions:  Preheat oven to 375 degrees. Spray a 9x13 baking pan with non-stick spray. Set aside.

Rinse chicken with water, and pat dry. Trim off any visible fat. Cut a deep, horizontal pocket in each piece of chicken. (Be careful not to cut all the way through) Stuff each chicken breast with one slice of Mozzarella cheese and 4 pepperoni slices. Sprinkle the tops of pepperonis with a dash of dried basil and garlic powder. Close the chicken breasts, and secure with a toothpick.

Spread the bread crumbs in a shallow dish or plate. Dredge each breast into the bread crumbs to coat lightly. Place all the coated and stuffed chicken breasts into the baking pan.

Bake for 30-35 minutes, or until chicken is thoroughly cooked. Remove pan from oven, and then remove the toothpicks from each chicken breast. Pour about 1/4 cup of marinara over each chicken breast. Sprinkle with shredded mozzarella and parmesan cheese. Place back in oven and bake another 5 minutes, or until cheese is melted and bubbly.

Serves 4


Adapted from: 10tentimes
Linked up at: Weekend Potluck

Weekend Potluck #23

To contact us Click HERE

   Weekend Potluck is up and running! We were thrilled to have over 190 entries last week. Such a great turnout! 

   I apologize for my absence on the blog this week. We have been super busy. One of my best friends came into town, so I had the chance to spend some time with her. Also, we are buying a new home!! We are hoping to close the first week of July, so it's a really exciting time for our family :)

I have some awesome recipes I will be posting next week, so stay tuned!!


Now, let's take a quick peek back at last week...


                        The recipe with the most clicks was ~

Hersheys Syrup Brownies                               Fight Back Brownies by Baking and Cooking, A Tale of Two Loves


                         Recipes that caught our attention ~

Bohemian Queso Dip                                             Bohemian "Queso" Dip by Newlyweds Blog


Summertime Tortellini Pasta Salad                                    Summertime Tortellini Pasta Salad by Diary of a Recipe Addict

Your hosts ~

  • Meet Penny ~ Tabitha
  • The Better Baker ~ Marsha
  • Sunflower Supper Club ~ Kim & Julie
  • Life As a Lofthouse ~ Holly
  • 4 Little Fergusons~ Tonya
  • The Country Cook~ Brandie
Remember that when you link up, it shows on all SIX blogs. Plus…

We TWEET. We PIN. We LIKE.

Linky Guidelines: If you wish to be a featured recipe or for us to promote your recipe either on Facebook, Twitter, or Pinterest, you MUST follow these instructions.
  1. Please link up to your exact post and not the main page to your blog.
  2. LINK BACK HERE from your post so that others can find the fun. (Need help linking back? Read this or watch this great instructional video.) You can use the button below or a direct link within your post.
When you are kind enough to follow our guidelines, we work hard to get you as much exposure as possible so that your time here is well invested. We want this to be a fun and rewarding experience for everyone!


Weekend Potluck Linky


23 Haziran 2012 Cumartesi

Valentine's Day Subway Art & Coordinating Print: Part 3 of 3

To contact us Click HERE
So here’s the third and final Valentine’s Day subway art option. I decided to go for more of a “classic” look with this one. Enjoy! J

 Download the prints below!


Here’s direction on how-to order this print from Costco:
***The Subway art is a 16x20 print, and the coordinating print is an 8x8 print.***
1.              Save the Subway Art to your computer. Then when you go to the            Costco website, click on PHOTO at the top and log in.
2.              Choose UPLOAD PHOTOS on the right sidebar. Choose the album          you want to upload it to or start a new album.
3.              Select your photo by clicking on the arrow in the box and find         where you saved the subway art and OPEN it.
4.              Under STEP 3 Select the FULL RESOLUTION UPLOAD. Then click on         START UPLOAD.
5.              After that's loaded, select ORDER PRINTS on the right sidebar. Select            the one you want and ADD TO CART.
6.              Under PRINT OPTIONS, I always select LUSTRE, but that's up to you         Under PRINT ORDER, select the size you want. (make sure to delete          the 4x6 they already have selected. Then click CONTINUE.
7.              Choose your warehouse... and then on the PLACE ORDER screen,          click on the EDIT OPTIONS and select DO NOT AUTOCORRECT MY          PRINTS. Click CONTINUE.
8.              Make sure your order is correct and PLACE ORDER.


I’m linking this post up at:
Metamorphosis Monday, Menu Plan Monday , Skip to My Lou, Tip Me Tuesday, Today’s Creative Blog


FREE St. Patrick's Day Subway Art Printable

To contact us Click HERE
It’s here and hot off the press! Enjoy the St. Patrick’s Day subway art I made for you. Please see below to download the file and for printing directions. J


Pin It


  Here’s direction on how-to order this print from Costco:

***The Subway art is a 16x20 print.***
1. Save the Subway Art to your computer. Then when you go to the Costco website, click on PHOTO at the top and log in.

2. Choose UPLOAD PHOTOS on the right sidebar. Choose the album you want to upload it to or start a new album.

3. Select your photo by clicking on the arrow in the box and find where you saved the subway art and OPEN it.

4. Under STEP 3 Select the FULL RESOLUTION UPLOAD. Then click on START UPLOAD.

5. After that's loaded, select ORDER PRINTS on the right sidebar. Select the one you want and ADD TO CART.

6. Under PRINT OPTIONS, I always select LUSTRE, but that's up to you Under PRINT ORDER, select the size you want. (Make sure to delete
the 4x6 they already have selected.) Then click CONTINUE.

7. Choose your warehouse... and then on the PLACE ORDER screen, click on the EDIT OPTIONS and select DO NOT AUTOCORRECT MY
PRINTS. Click CONTINUE.

8. Make sure your order is correct and PLACE ORDER.


I’m linking this post up at:
Metamorphosis Monday, Menu Plan Monday , Skip to My Lou, Tip Me Tuesday, Today’s Creative Blog